Introduction
The Plight of a Broken iPhone
Experiencing a damaged iPhone screen or water immersion can induce immediate panic for any user, thinking about the risk of losing precious photos, contacts, and messages. The frustration of not being able to navigate your malfunctioning device adds to the stress, elevating the urgency to find a reliable solution to extract and transfer your data.
Quick Overview of Transferring Data from a Broken iPhone
Navigating the recovery of data from a broken iPhone can seem daunting, but there are a variety of methods to accomplish this task. Whether it involves restoring from an iCloud or iTunes backup, using specialized software to extract data directly from the phone’s storage, or opting for professional data recovery services, solutions are available for different scenarios. The approach you take will largely depend on the state of your iPhone and the type of damage it has sustained. With the right strategy, transferring your vital information to a new or repaired iPhone can often be achieved.
Choosing the Best iPhone Data Recovery Method
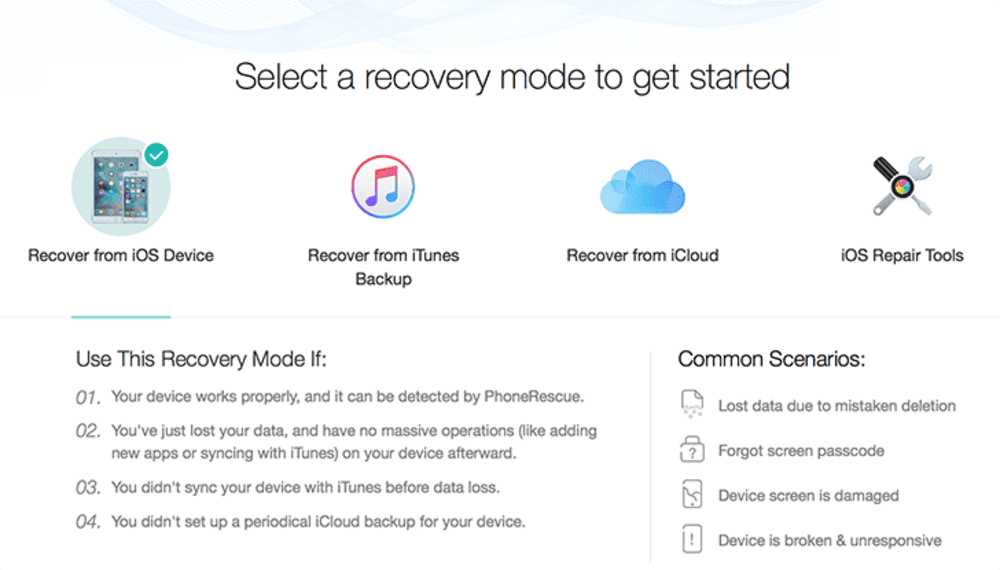
iCloud and Its Magic Wand for iPhone data recovery from broken phone
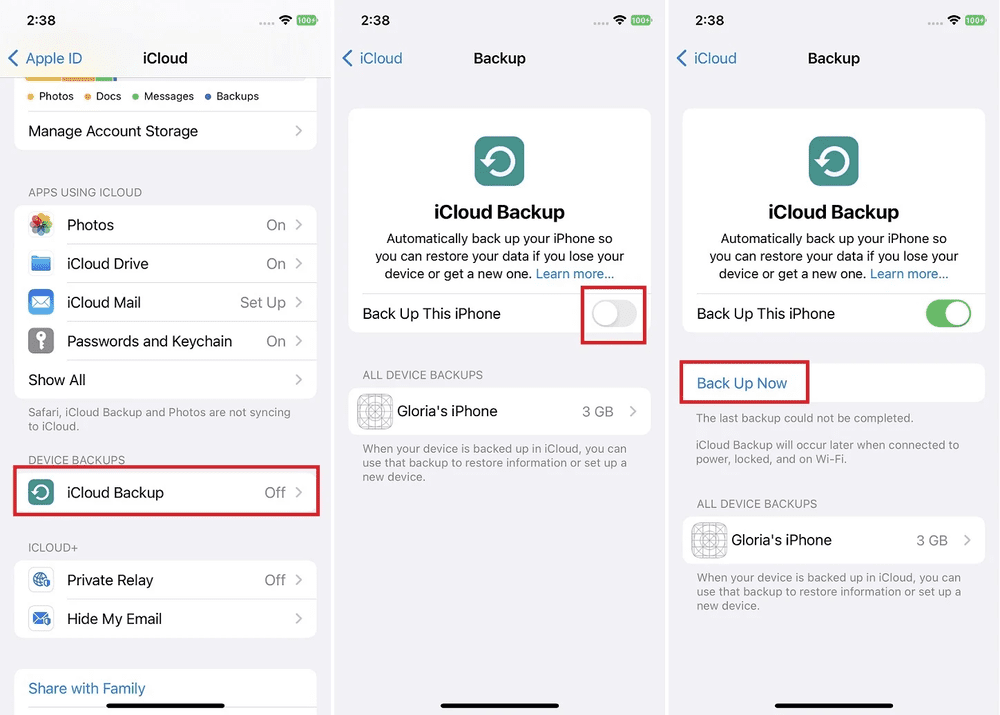
iCloud serves as a lifeline when it comes to retrieving data from a broken iPhone. If you had iCloud Backup enabled on your device, you have access to a magic wand of sorts. It silently backs up your important information when the iPhone is charging and connected to Wi-Fi. This means that you can restore your data to a new device without having to physically connect your damaged phone. Recovering contacts, photos, notes, and more through iCloud is a streamlined process that can be initiated during the setup of a new iPhone or through the settings of an existing device where you’re signed in with your Apple ID.
Recover data from dead iPhone via iTunes backup
If your iPhone is no longer operational, recovering your data via an iTunes backup could be your saving grace. Provided you’ve been diligent with regularly syncing your iPhone with iTunes, you can restore your data to a new device with ease. The steps are simple: connect your new iPhone to the computer with the existing iTunes backup, select your device within iTunes, and choose to restore from the most recent backup. Ensure that iTunes is updated to the latest version to prevent any compatibility issues during this crucial process. It’s an efficient method, avoiding the need for the dead iPhone to function and not depending on an internet connection like iCloud might.
The Ultimate Guide to Transfer data from broken iPhone
Using iTunes or iCloud Backups to Transfer Data
Utilizing iTunes or iCloud backups is the most straightforward method to transfer your data when dealing with a broken iPhone. To begin, ensure you have a functioning iPhone to restore the data to, either a new device or a repaired version of your old one. If you’re using an iTunes backup on your computer, connect the new iPhone using a USB cable and open iTunes. You’ll have the option to restore your iPhone from a backup, where you can select the most recent backup file.
On the other hand, for iCloud backups, the process is even more seamless. Sign into your iCloud account with your Apple ID on the new iPhone and proceed with the setup. During the setup, you’ll have the opportunity to restore your iPhone from an iCloud backup. Your data, including your photos, contacts, app data, device settings, and more, will transfer over to the new device. It’s essential to remember that restoring from backups only brings over the data up to the point of the last backup, so regular backups are crucial.
How to transfer data with broken iPhone screen?
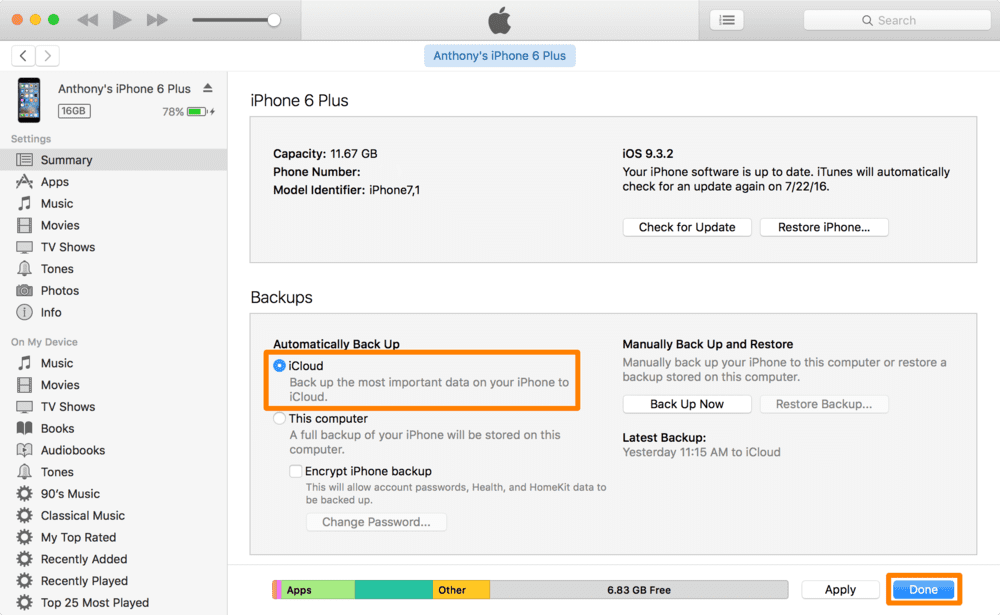
Transferring data from an iPhone with a broken screen is possible as long as the device itself still functions. If the screen is the only issue and the iPhone responds to inputs, you can back up your data to a computer using iTunes. Here’s a simplified process:
- Connect the iPhone with the broken screen to your computer via USB.
- Open iTunes and select your device.
- Navigate to the ‘Summary’ tab and click on ‘Back Up Now.’
- Wait for the backup process to finish before disconnecting.
Once you have a backup, you can transfer the data to your new iPhone by repeating the same connection process with the new device. Then, from iTunes, select ‘Restore Backup,’ choose the relevant backup file, and wait for the data to transfer to your new device. Additionally, if Touch ID or Face ID is difficult to use due to the cracked screen, ensure you have a passcode that can be entered if prompted during the backup process.
Transfer data from broken iPhone to new iPhone via FoneTool successfully
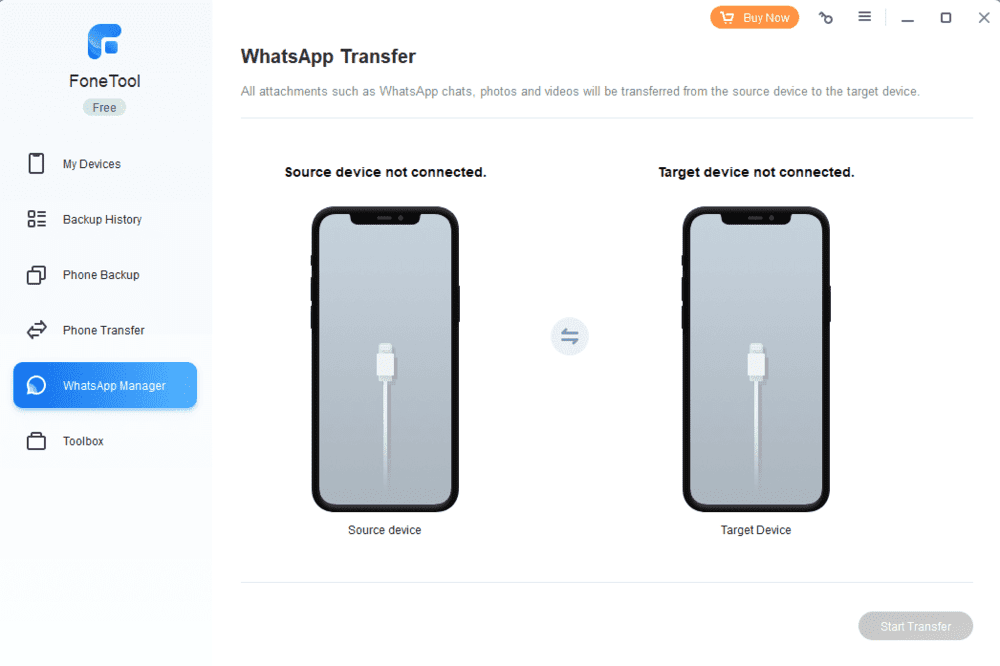
When conventional methods are not an option, FoneTool provides a reliable alternative to transfer data from a broken iPhone to a new one. FoneTool specializes in one-click data migrations without risking further loss. Here’s a step-by-step guide to use this tool effectively:
- Begin by downloading the FoneTool software for your Windows computer and complete the installation.
- Open the software and connect both the broken iPhone and the new iPhone to your computer using USB cables.
- In the FoneTool interface, select ‘Phone Transfer’ followed by ‘iPhone to iPhone’ and then click on ‘Start Transfer’.
- Before proceeding, you can enable ‘Backup Encryption’ to secure your private data.
- Choose the specific types of data you wish to transfer. This can include contacts, photos, music, and videos, among other file types.
- Click ‘Start Transfer’ to initiate the data migration process.
The transfer will be conducted securely, and FoneTool ensures compatibility with all iOS versions, making it a hassle-free experience. Remember to regularly back up your crucial data with tools like FoneTool to prevent future data loss scenarios.
Do we need to turn off cell service on iPhone before data transferring?
You don’t necessarily need to turn off cell service on your iPhone before transferring data. In fact, it’s usually better to keep it on if you’re transferring a large amount of data. However, if you’re concerned about cellular data usage charges, you can turn it off and rely solely on Wi-Fi. Just be sure you have a strong and stable Wi-Fi connection to avoid any interruptions during the transfer.
Here is how to turn off cell service on an iPhone:
- Open the “Settings” app on your iPhone.
- Tap on “Cellular” or “Mobile Data” depending on your iOS version and region settings.
- Switch the “Cellular Data” toggle to the off position (it should go from green to grey).
- This will turn off cellular data and effectively disable internet access over the mobile network.
- If you want to turn off the cellular service completely (which includes voice calls and text messages), enable “Airplane Mode” by going back to the main settings page and tapping on the “Airplane Mode” toggle. This will also disable Wi-Fi and Bluetooth unless you manually re-enable them while in Airplane Mode.
Practical Tips for a Smooth Transition
To ensure a smooth transition when transferring data from a broken iPhone, consider the following practical tips:
- Prepare Your Devices: Ensure both the broken iPhone and the new device are fully charged to avoid interruptions during the transfer process.
- Back Up Regularly: Regular backups to iCloud or iTunes can considerably simplify the recovery process in the event of a broken iPhone.
- Stay Updated: Keep iOS and your chosen backup and transfer tools up-to-date to avoid any compatibility issues during the transfer.
- Use Official Cables and Adapters: To ensure a stable connection and avoid further damaging your devices, always use official or certified third-party cables and adapters.
- Consider Professional Assistance: If you’re not confident in your technical skills or if the iPhone is severely damaged, seek professional services to help with the data transfer.
Remember, the goal is to retrieve your data securely without causing additional damage to your devices, so take your time and follow each step carefully for a successful data transfer.
Wrapping It Up: Conclusion
Making the Right Choice for Your Data
Selecting the appropriate method for your data retrieval is critical. The right choice hinges on several factors, such largely on the state of your broken iPhone and the regularity of your backups. iCloud and iTunes offer robust solutions if backups were performed consistently before the device was damaged. If a backup isn’t available, or if the device is inaccessible, tools like FoneTool can be lifesavers. Prioritize safety and security; if the task feels overwhelming, it’s wise to consult a professional. Remember, the objective is to protect your personal data throughout the transfer process.
In conclusion, while the experience of a broken iPhone is always distressing, modern tools and services have made data recovery and transfer more approachable than ever. Taking the time to assess your situation and making the best choice based on your needs will help you recover from this digital setback with your data intact.
Moving Forward with Your New iPhone
Stepping ahead with your new iPhone after a successful data transfer is a fresh start. To prevent future data loss and ensure a more effortless transition should you face a similar situation again, be proactive:
- Set Up Regular Backups: Automate iCloud backups or schedule regular iTunes backups.
- Manage Your Storage: Regularly check and manage your iCloud storage to ensure that you won’t run out of space for backups.
- Protect Your iPhone: Invest in a robust case and screen protector to minimize the risk of physical damage.
- Explore iCloud Services: Familiarize yourself with iCloud’s ‘Find My iPhone’ and ‘iCloud Drive’ features to add additional layers of protection for your device and data.
- Stay Informed: Keep yourself updated with the latest iOS features and data management tools.
By taking these steps, you can minimize the risk of future data loss and feel more secure about your iPhone data’s safety.
FAQs on Transferring Data from a Broken iPhone
How to get back the photos off from a broken iPhone?
To get photos from a broken iPhone, you have a few options:
- If you’ve enabled iCloud Photos, log into iCloud.com from a web browser to access your pictures.
- Use an iTunes backup: Connect a new iPhone to your computer, open iTunes, select ‘Restore Backup’, and choose the relevant backup with your photos.
- Use third-party software like MiniTool Mobile Recovery to extract photos directly from your broken iPhone.
Each method requires prior setup or the iPhone to at least power on. If it won’t turn on, a data recovery service might be necessary.
How to switch from one iPhone to another?
Switching from one iPhone to another is streamlined using these steps:
- Backup your old iPhone to iCloud or iTunes.
- Turn on your new iPhone and follow the on-screen setup until you reach the ‘Apps & Data’ screen.
- Choose ‘Restore from iCloud Backup’ or ‘Restore from iTunes Backup’ and select your latest backup.
Keep both iPhones charged during the process and ensure a stable Wi-Fi connection for iCloud restores.
What should I do when my mobile service temporarily turned off by carrier after transferring data?
If mobile service is turned off by your carrier after transferring data:
- Recheck your account status with your carrier to ensure the service isn’t suspended or there are billing issues.
- Restart your new iPhone to reset network connections and potentially resolve the issue.
Contact your carrier for assistance if service doesn’t resume.

Leave A Comment